

Use ChronoTab from your AI assistant
For members, managers and admins
An AI assistant can record your time for you while you work. You connect it once to your ChronoTab account, and it can then start and stop a timer on the issue you are working on, log time against an issue, and tell you which days you are missing. This page explains what it can and cannot do, how to connect it, and how to disconnect it.
There are two ways to connect, and the assistant can do the same things either way:
- By signing in (claude.ai, ChatGPT, Gemini and Claude Code): you add ChronoTab in the assistant, sign in to ChronoTab and approve the connection. No key to copy. See Connect by signing in.
- With a key (Claude Code, Cursor or VS Code): you create an API key in your Profile and paste the setup it gives you. See Connect an assistant with a key.
Before you start
Section titled “Before you start”- Any organisation can connect an assistant, on every plan, Free included. Every role can: members, managers and admins alike.
- A connection works for one organisation only. If you belong to several organisations, connect once for each one.
- The assistant works with your own account only. It acts as you, in one organisation, and it can do exactly what you can do in ChronoTab through the tools below.
- The assistant’s own product decides who can add a connector there. Some chat apps limit it to certain plans, roles or countries.
What the assistant can do
Section titled “What the assistant can do”In short: ChronoTab can start and stop timers, log time against an issue, list your own entries, search issues, show the days you are missing and, for admins and managers, read client hours. It cannot edit or delete entries, discard timers, or create, submit or approve timesheets. This is the same whichever assistant you use and however you connect it, on every plan.
ChronoTab gives the assistant nine tools. In plain words:
| Tool | What it does |
|---|---|
get_current_timer |
Shows whether one of your timers is running, and on which issue. |
start_timer |
Starts a timer on an issue you name. |
stop_timer |
Stops one of your running timers, and keeps the time it recorded. |
log_time |
Logs a duration you give against an issue, on a date you give. |
list_my_entries |
Lists your own time entries for a date range. |
search_issues |
Finds issues in the repositories your organisation tracks, so the assistant can name the right one. |
get_my_gaps |
Lists the weekdays in a range on which you have no time logged. |
list_clients |
Lists your organisation’s clients. Admins and managers only. |
get_client_hours |
Shows the hours logged for a client over a period. Admins and managers only. |
Members can use the first seven tools. The last two read client hours, so for a member they return the same refusal the website gives.
ChronoTab tells the assistant to confirm the duration and the issue with you before it logs time. Check the issue it names before you agree: the entry is logged against that issue, and the assistant cannot move it to another one.
What the assistant cannot do
Section titled “What the assistant cannot do”The assistant is deliberately limited. It cannot:
- edit or delete a time entry, including one it logged;
- discard a running timer;
- create, submit, approve, reject or void a timesheet;
- anything else outside the nine tools. There are no others, so it cannot change settings, members, repositories or your plan either.
To correct an entry, edit or delete it on the website or in the extension, as you would any other entry. See Edit and delete entries.
How its entries appear
Section titled “How its entries appear”Time the assistant logs is ordinary billable time. It counts in your reports and on a timesheet exactly as time logged any other way does, and your client can see it there.
Each entry the assistant creates is marked as logged by an AI assistant, not as typed by hand or logged from GitHub. The mark shows wherever the entry’s source is shown, so you and your admin can tell which time came from an assistant if a client asks.
Connect by signing in
Section titled “Connect by signing in”You add ChronoTab in the assistant, sign in to ChronoTab, and approve the connection. There is no key to copy and no client ID or secret to enter: the assistant finds ChronoTab’s sign-in settings from the server URL. Every assistant uses the same server URL:
https://api.chronotab.com/v1/mcpThe ChronoTab part is the same in every assistant:
- In the assistant, add ChronoTab with the server URL above. The steps for each assistant are below.
- The assistant opens a ChronoTab page in your browser. If you are not signed in to ChronoTab in this browser, sign in with Google or GitHub, as you normally do.
- ChronoTab asks Connect assistant to ChronoTab?, with the assistant’s name and its web address, and the line After you choose, you’ll go back to web address.
- Under Organisation, pick the organisation the assistant should work in. You can pick one.
- Under What it can do, check what the assistant will and won’t be able to do: It will be able to start and stop timers, log time against an issue, list your own entries, search issues, show the days you are missing and, for admins and managers, read client hours. It won’t be able to edit or delete entries, discard timers, or create, submit or approve timesheets.
- Choose Approve. ChronoTab sends you back to the assistant, which is now connected. Choose Deny instead if you don’t recognise the request; ChronoTab shows Connection cancelled and nothing is connected.
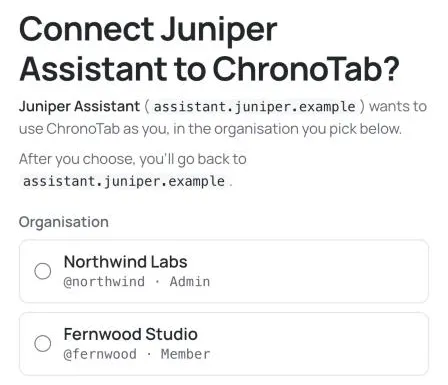
Check the web address ChronoTab shows before you approve. The assistant’s name comes from the assistant itself; the address is where ChronoTab will send you back to.
An assistant that runs on your own computer, such as Claude Code, can only return to localhost. ChronoTab then warns This assistant runs on your computer. It only returns to localhost. Approve only if you started this connection yourself.
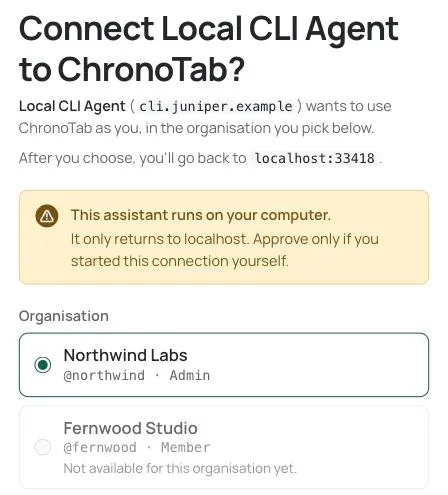
An organisation that can’t connect an assistant yet is listed but can’t be picked, and shows Not available for this organisation yet. If none of your organisations can, ChronoTab says None of your organisations can connect an assistant yet. Nothing has been connected.
The ChronoTab page works once and expires after 10 minutes. If it has expired, ChronoTab shows This request has expired; start again from the assistant.
claude.ai
Section titled “claude.ai”- In Claude, open Settings > Connectors and choose Add custom connector.
- Enter a name, such as ChronoTab, and paste the server URL. Leave the OAuth client ID and client secret fields empty.
- Choose Connect.
- Sign in to ChronoTab, pick the organisation and choose Approve.
- In a chat, turn on the ChronoTab connector.
In ChronoTab the connection is listed under Connected assistants as Claude (claude.ai).
ChatGPT
Section titled “ChatGPT”- In ChatGPT, choose Plugins in the left sidebar, then Add, then Add custom MCP server.
- Enter a name, such as ChronoTab, and a description if you want one.
- Under Connection, choose Server URL and paste the server URL.
- Under Authentication, choose OAuth. ChatGPT finds ChronoTab’s sign-in settings and identifies itself to ChronoTab on its own, so there is no client ID to enter.
- Tick ChatGPT’s notice about the risks of custom servers, and choose Create as a plugin.
- Sign in to ChronoTab, pick the organisation and choose Approve.
- In a chat, type
@and pick ChronoTab.
Gemini
Section titled “Gemini”Gemini calls these custom apps. These steps are from Google’s help page, Connect & manage custom apps for Gemini Apps.
- Go to gemini.google.com on a computer. You can only add a custom app in the web app; once added, it works in the Gemini mobile app too.
- Choose Settings, then Connected Apps. If you don’t see Connected Apps, choose Personal Intelligence, then Connected Apps.
- Under Custom apps, choose Add a custom app, and paste the server URL. You don’t need to enter any credentials: ChronoTab registers Gemini for you.
- Choose Next, and follow the on-screen steps.
- Sign in to ChronoTab, pick the organisation and choose Approve.
- In a chat, type
@and pick ChronoTab.
Google sets who can add custom apps: at the time of writing, a personal Google Account (not a work or school one), in the US, aged 18 or over, with Keep Activity turned on, in English. Check Google’s page if the option is missing.
Claude Code
Section titled “Claude Code”-
In a terminal, add the server without a key:
Terminal window claude mcp add --transport http chronotab https://api.chronotab.com/v1/mcp -
Start Claude Code and type
/mcp. -
Pick chronotab, then choose Authenticate. Claude Code opens ChronoTab in your browser.
-
Sign in to ChronoTab, pick the organisation and choose Approve. ChronoTab warns that the assistant runs on your computer; approve if you just ran the command yourself.
-
Go back to Claude Code, and ask it what timer is running, to check the connection.
Claude Code can also connect with a key instead.
Other assistants
Section titled “Other assistants”Any assistant that supports remote MCP servers with OAuth sign-in can connect the same way: add the server URL, then sign in to ChronoTab and approve. Cursor and VS Code connect with a key.
One connection, one organisation
Section titled “One connection, one organisation”Each connection works in the one organisation you picked when you approved it. The assistant cannot switch organisation.
To use the assistant in another organisation, connect again and pick that organisation. How you do that depends on the assistant: in most, you add ChronoTab a second time under another name, such as ChronoTab Juniper Robotics.
If you approve the same assistant for the same organisation again, the new connection replaces the old one. You never end up with two connections from one assistant to one organisation.
If an assistant doesn’t use its connection for 90 days, ChronoTab disconnects it. Connect again to carry on.
Connect an assistant with a key
Section titled “Connect an assistant with a key”Use a key for Claude Code, Cursor or VS Code, which run on your computer. Cursor connects this way.
-
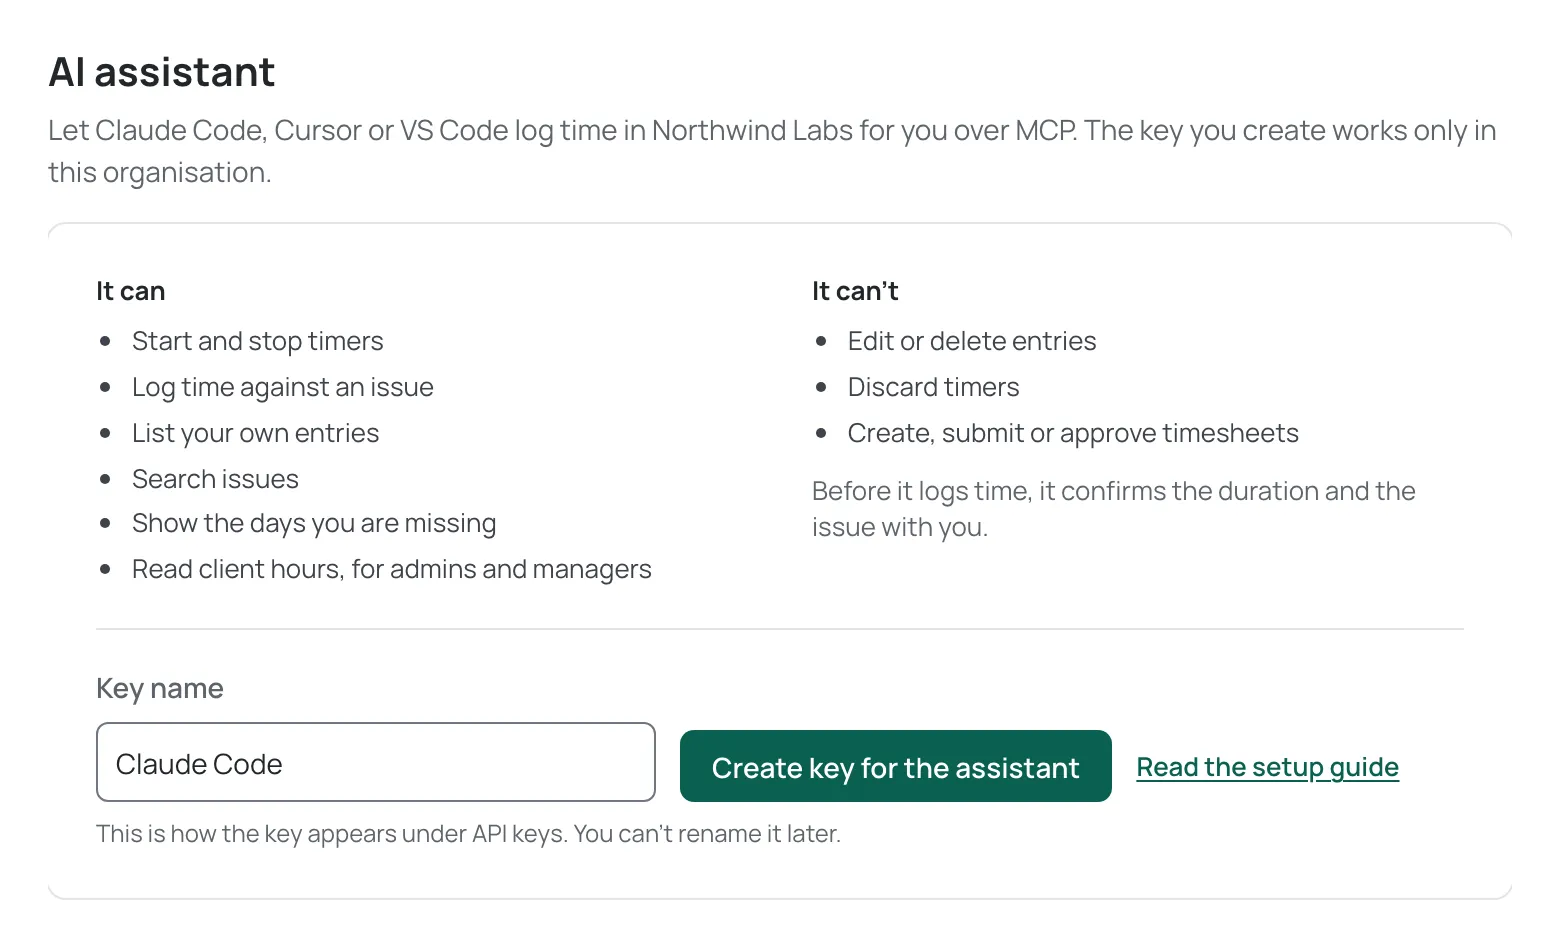
Open Profile and choose AI assistant in the menu on the left. It lists what the assistant can and can’t do, and a Key name field. To pick another organisation, switch organisation in the sidebar.
-
In Key name, keep the suggested name Claude Code, or type a name that says which assistant you will use, such as Cursor laptop.
-
Choose Create key for the assistant.
-
A notice reads Copy this key now. ChronoTab shows it only once. It shows the key, with Copy and Done, and the setup for each assistant with your key already filled in:
- Claude Code: a single command to run in a terminal.
- Cursor: a JSON document for
.cursor/mcp.jsonin a project, or~/.cursor/mcp.jsonfor every project. - VS Code: a JSON document for
.vscode/mcp.jsonin a workspace.
-
Choose Copy beside the setup for your assistant, and paste it where the note says.
-
Choose Done.
The key is shown only once. After you choose Done, the setup goes off the screen and the full key cannot be seen again. If you lose it, revoke it and create a new one.
The key also appears at the top of API keys, further down the same page, so you can see it and revoke it there. You see only your own keys.
If your browser does not allow copying with the button, ChronoTab tries another way to copy. If that fails too, it tells you, and you can select the text and copy it by hand.
Claude Code with a key
Section titled “Claude Code with a key”Run the copied command in a terminal. It adds the ChronoTab server to Claude Code under the name chronotab. Start a new Claude Code session and ask it what timer is running, to check the connection.
Cursor
Section titled “Cursor”Paste the copied JSON into .cursor/mcp.json in your project, or into ~/.cursor/mcp.json to use it in every project. Restart Cursor, then check that the chronotab server is listed and connected in Cursor’s MCP settings.
VS Code
Section titled “VS Code”Paste the copied JSON into .vscode/mcp.json in your workspace. VS Code offers to start the server defined in the file. Start it, and approve the tools when VS Code asks.
See and disconnect assistants
Section titled “See and disconnect assistants”- Open Profile and choose AI assistant in the menu on the left.
- Under Connected assistants, each assistant you connected in this organisation is listed with its name, its web address, when you connected it (Connected date) and when it was last used (Last used date, or Not used yet).
- To stop one, choose Revoke on its row. Under the row, ChronoTab asks you to confirm, for example Revoke Claude? Choose Revoke access, or Cancel to keep it.
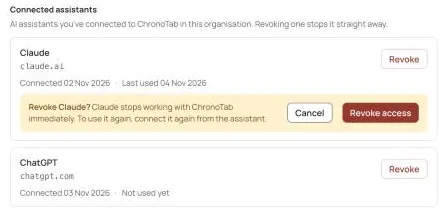
Revoking stops the assistant straight away: the next time it calls ChronoTab, it is asked to sign in again. To use it again, connect it again from the assistant. If the revoke fails, ChronoTab says the assistant wasn’t revoked and can still use ChronoTab, with Try again.
Removing ChronoTab in the assistant’s own settings doesn’t always tell ChronoTab. To be sure an assistant can no longer act for you, revoke it in ChronoTab too.
Assistants connected with a key are not listed here. Revoke their key instead: see Revoke the key.
For admins
Section titled “For admins”On the Members page, choose a member’s API keys button. Below their keys, the Connected assistants section lists the assistants they have connected, with the same Revoke and Revoke access confirmation.
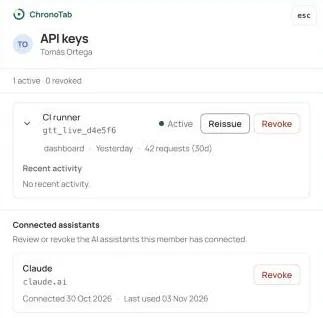
Connecting and revoking an assistant are recorded in the organisation’s audit log as oauth.grant (connected assistant name (web address)), oauth.revoke (revoked assistant …, by the person who connected it) and oauth.revoke-other (revoked assistant …, by an admin, with the member as the target).
Example
Section titled “Example”Northwind Labs uses ChronoTab. Ada, a member, works on the northwind/platform repository and uses Claude Code. She connected it with /mcp and Authenticate, and approved it for Northwind Labs.
She asks the assistant: “Start a timer on the login bug, issue 412.” The assistant searches for the issue, names it back to her as northwind/platform#412, and starts the timer once she confirms. At the end of the afternoon she asks it to stop the timer. The entry it leaves is marked AI assistant in her timesheet, the same as any other billable entry.
Ada also does a few hours a week for Juniper Robotics, a second organisation she belongs to. In claude.ai she added ChronoTab twice: ChronoTab Northwind approved for Northwind Labs, and ChronoTab Juniper approved for Juniper Robotics. When she asks claude.ai to log 45 minutes on juniper-robotics/atlas-api#88, she turns on ChronoTab Juniper for that chat. Both connections are listed under Connected assistants in her Profile, one in each organisation.
Revoke the key
Section titled “Revoke the key”This is for an assistant connected with a key. For an assistant you connected by signing in, see See and disconnect assistants.
Revoking a key stops the assistant at once. Any assistant still using the key gets an authorisation error the next time it calls ChronoTab.
- Open Profile and choose API keys in the menu on the left.
- Find the key by its name or its prefix (the table shows the part after
gtt_live_). - Choose Revoke on the key’s row.
- Check that the confirmation under the row names the right key, then choose Revoke key.
Admins can also revoke any member’s key from that person’s API keys panel on the Members page.
A revoked key shows as Revoked in the list. You can then remove the setup file from the assistant’s configuration. To connect again, create a new key.
Next steps
Section titled “Next steps”- Check your gaps in the week: My week.
- Log time from the website instead: Log time from the dashboard.
- Manage every key in the organisation: Organisation API keys.
Need help? Email support@chronotab.com.